
Behavior Trees from scratch
Behavior trees and its components
Behavior trees are one of the fundamentals parts of creating complex AI for your games. It is also relatively easy to make without a help of any third party addons.
But if you want ready made solution, here is the one that I find it useful:
If you want to know more about it, let me know in the comments.
In this tutorial we will create behavior trees from scratch, and create AI for games with it. Everything will be written in GDScript, but it should be easily transferable to any language of your choice.
The source code with the example scene is available here:
How behavior trees work?
Behavior trees are like decision trees for AI characters. They break down complex behaviors into smaller and manageable tasks called nodes, each node performs arbitrary logic and returns a status. Which can be used by its parent node to make some sort of decision (move to some next node, or exit).
Now, let’s have conceptual look over what we are trying to achieve.
graph TD
  Root --> Sequence
  Sequence --> Action_1
  Sequence --> Selector_1
  Sequence --> Action_2
  Selector_1 --> Selector_2
  Selector_1 --> Action_5
  Selector_1 --> Action_6
  Selector_2 --> Action_3
  Selector_2 --> Action_4
Example Behaviour tree
In behavior trees each node performs some action, and propagates the result upward. For example, result of the Action_3 node will be sent to Selector_2 node which will do some action with it. It might move to the next node, or propagate the status to Selector_1 node.
We will divide nodes of our behavior tree into the following categories:
- Composite - nodes that operate on one or more child nodes
- Decorators - nodes that operate only on one child node
- Leaf - our action nodes, these nodes will perform the game logic
Each node will have its execution status represented by enum.
enum Status {
    RUNNING,
    SUCCESS,
    ERROR
}
What kind of composite nodes are needed for behavior trees?
- Sequence - for the node to return a successful status, every child node should have successful status, if one of the child nodes returns an error, then sequence also returns an error.
- Selector - if any of its child nodes returns a successful status then it returns a successful status
- Random selector - as the name suggests selects random child node and evaluates its result until one of them succeeds. We will not cover them in this tutorial, so I advice you to try to create it by yourself
What kind of decorators are needed for behavior trees?
-
Negator - negates the status of its child node, for example, if child node returns
SUCCESS, will returnERROR, vice versa - Succedor - will result in success even if child node returns an error status
- Repeater - repeats evaluation of its child node regardless of its status, will be our root node
- RepeatUntilFail - repeats evaluation until child node fails
Adding shared context between our nodes
It is useful to share data between action nodes so our behavior trees will have shared context. This context could be used to pass around data between nodes. For example we will have a FindTargetNode which will search for a target, if it found one, it will write it into shared context, which later will be used by our MoveToTarget Node.
I should also note that you should probably use context as custom class, to not lose performance, and have static typing. You can also use mutexes in custom classes to avoid parallel writes and avoid race conditions.
How to create behavior trees in Godot?
Now lets implement our base behavior node:
class_name BehaviourNode
extends Node

enum Status {
	RUNNING,
	SUCCESS,
	ERROR,
}


func evaluate(context: Dictionary) -> Status:
	push_error("Not implemented evaluate in BT, %s" % [name])
	return Status.ERROR
It is quite simple, it contains enum with status and evaluate method that gets context Dictionary and returns Status.
Now we will create our root or Repeater Node
class_name RepeaterNode
extends BehaviourNode

@export var node: BehaviourNode


func evaluate(context: Dictionary) -> BehaviourNode.Status:
	node.evaluate(context)
	return BehaviourNode.Status.RUNNING
As you can see, it just gets some behaviour Node and runs it indefinitely.
You can also customize the repeater node to add some sort of limit. For example, it will reevaluate its node certain amount of time if it gets an error, so you can think of it something like retry logic.
With this two classes created, we can write our behaviour tree.
class_name BehaviourTree
extends Node

@export var root: RepeaterNode
var _context: Dictionary = {}


func _process(delta: float) -> void:
	root.evaluate(_context)
It will just call evaluate on the root node every frame. It is not required to run it each frame, but for this tutorials' use case it works fine.
When we will create our SequenceNode, we will be ready to create game logic with it. Our sequence node will look like this:
class_name SequenceNode
extends BehaviourNode

@export var nodes: Array[BehaviourNode] = []

var current_node: int = 0


func _reset_state() -> void:
	current_node = 0


func evaluate(context: Dictionary) -> BehaviourNode.Status:
	if len(nodes) == 0:
		_reset_state()
		return BehaviourNode.Status.SUCCESS

	var bt_node: BehaviourNode = nodes[current_node]
	var result: BehaviourNode.Status = bt_node.evaluate(context)
	if result == BehaviourNode.Status.ERROR:
		_reset_state()
		return BehaviourNode.Status.ERROR

	if result == BehaviourNode.Status.SUCCESS:
		if current_node == len(nodes) - 1:
			_reset_state()
			return BehaviourNode.Status.SUCCESS

 		current_node += 1

	return BehaviourNode.Status.RUNNING
I decided to reset state of the node when it receives finishing status, but its up to you decide if this behavior something you like. I believe this use case works fine, and you can do very complex logic with it.
How to create action nodes for behavior trees?
We now have, one composite node, one decorator, behaviour tree, and we can start adding some of our action nodes. In this tutorial we will make AI walk towards a target, and try to attack the target.
class_name FindTarget
extends BehaviourNode

const target_ctx_name: StringName = "target"


func evaluate(context: Dictionary) -> BehaviourNode.Status:
	var target_node: Node = get_node("/root/GameplayScene/target")
	if target_node == null:
		return BehaviourNode.Status.ERROR

	context[target_ctx_name] = target_node

	return BehaviourNode.Status.SUCCESS
As you can see it just gets a node with name target and assigns it inside a context. Now with target set, we can create our next action node called MoveToTarget. It will look like the following.
class_name MoveToTarget
extends BehaviourNode

func evaluate(context: Dictionary) -> BehaviourNode.Status:
	if not FindTarget.target_ctx_name in context:
		push_error("Target is not in context")
		return BehaviourNode.Status.ERROR

	var target: Node = context[FindTarget.target_ctx_name]
	if not target is Node3D:
		push_error("Target is not node 3d, got %s"  % [target])
		return BehaviourNode.Status.ERROR


	return BehaviourNode.Status.RUNNING
We defined as constants name of our variables inside a context, ideally you should have statically typed context, but for now it is alright. We will later try to move our context constants to somewhere more reasonable, so it will be easier to refactor if changes will occur later on.
I won’t be going too complex with movement logic, it will be just movement towards a target using simple vector math, but it should be quite easy to put path finding algorithm here. So now our MoveToTarget will look like this:
class_name MoveToTarget
extends BehaviourNode

# Variables to control the logic
@export var move_node: CharacterBody3D
@export var reach_distance: float = 1
@export var move_speed: float = 300


func evaluate(context: Dictionary) -> BehaviourNode.Status:
	if not FindTarget.target_ctx_name in context:
		push_error("Target is not in context")
		return BehaviourNode.Status.ERROR

	var target: Node = context[FindTarget.target_ctx_name]
	if not target is Node3D:
		push_error("Target is not node 3d, got %s"  % [target])
		return BehaviourNode.Status.ERROR

	var target_position: Vector3 = (target as Node3D).position
	if has_reached_target(target_position):
		return BehaviourNode.Status.SUCCESS

	# Movement logic is here
	var movement_direction: Vector3 = target_position - move_node.position
	move_node.position += movement_direction.normalized() * (move_speed * get_process_delta_time())

	return BehaviourNode.Status.RUNNING


func has_reached_target(target_position: Vector3) -> bool:
	var distance: float = target_position.distance_to(move_node.position)
	return distance < reach_distance
With that done lets test it out. First lets create simple Enemy scene which looks like the following:
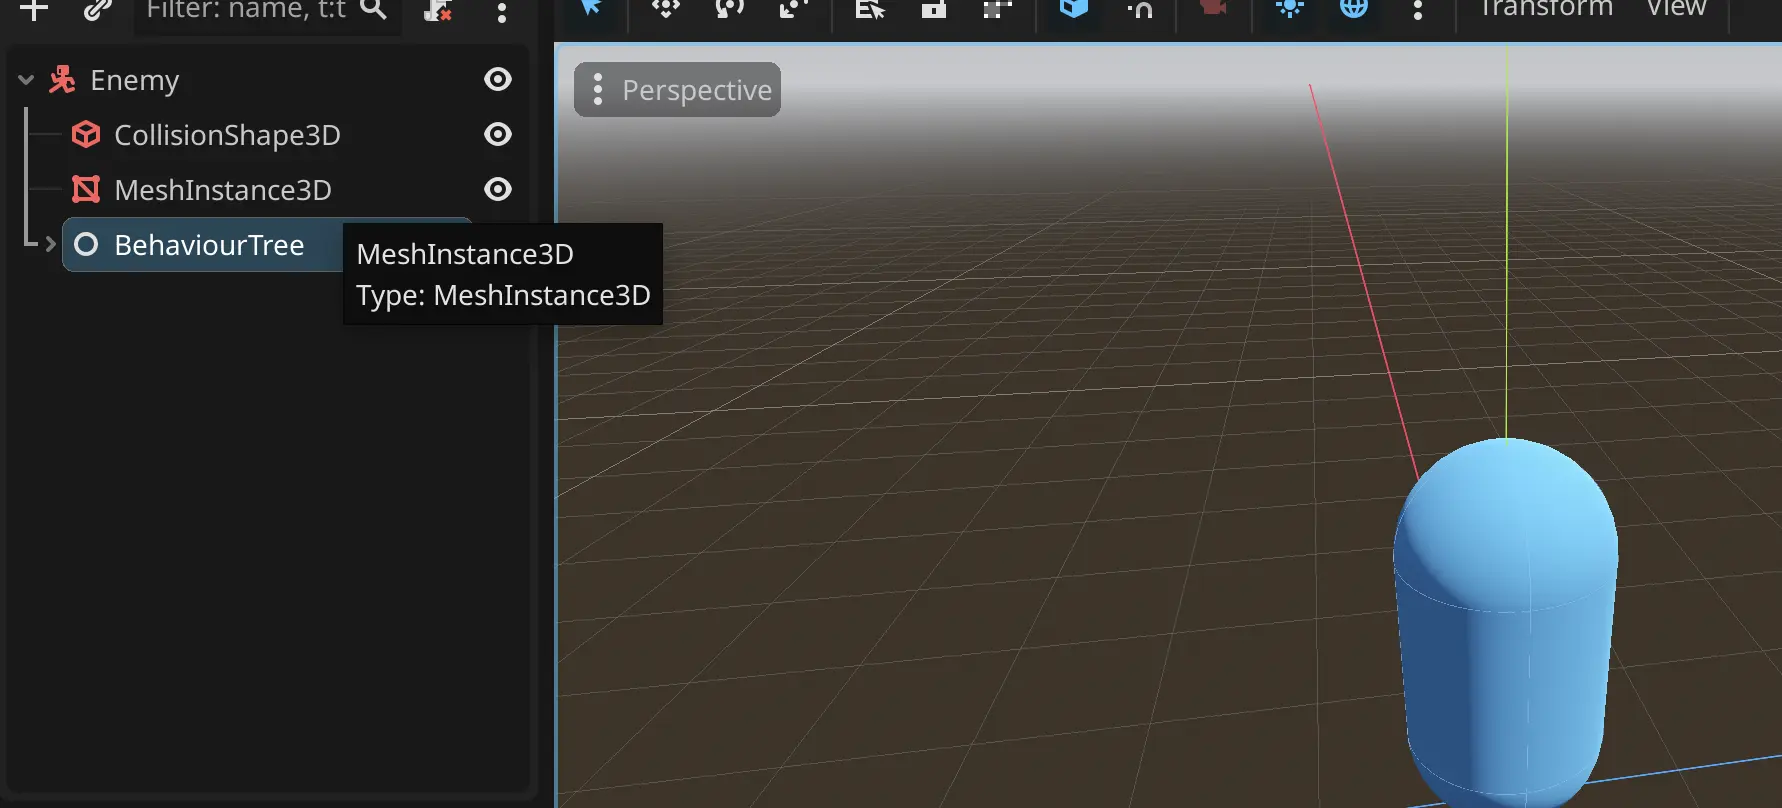 Enemy scene structure
Then let's create our behavior tree nodes in the following manner:
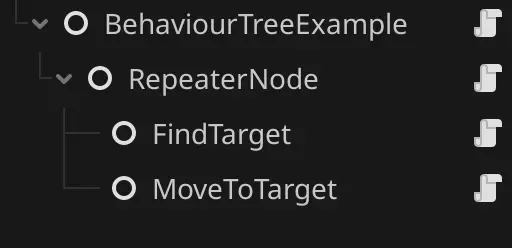 Node structure for the enemy
And let's assign all variables for our nodes and behavior tree.
I created small scene like this to better demonstrate what is happening:
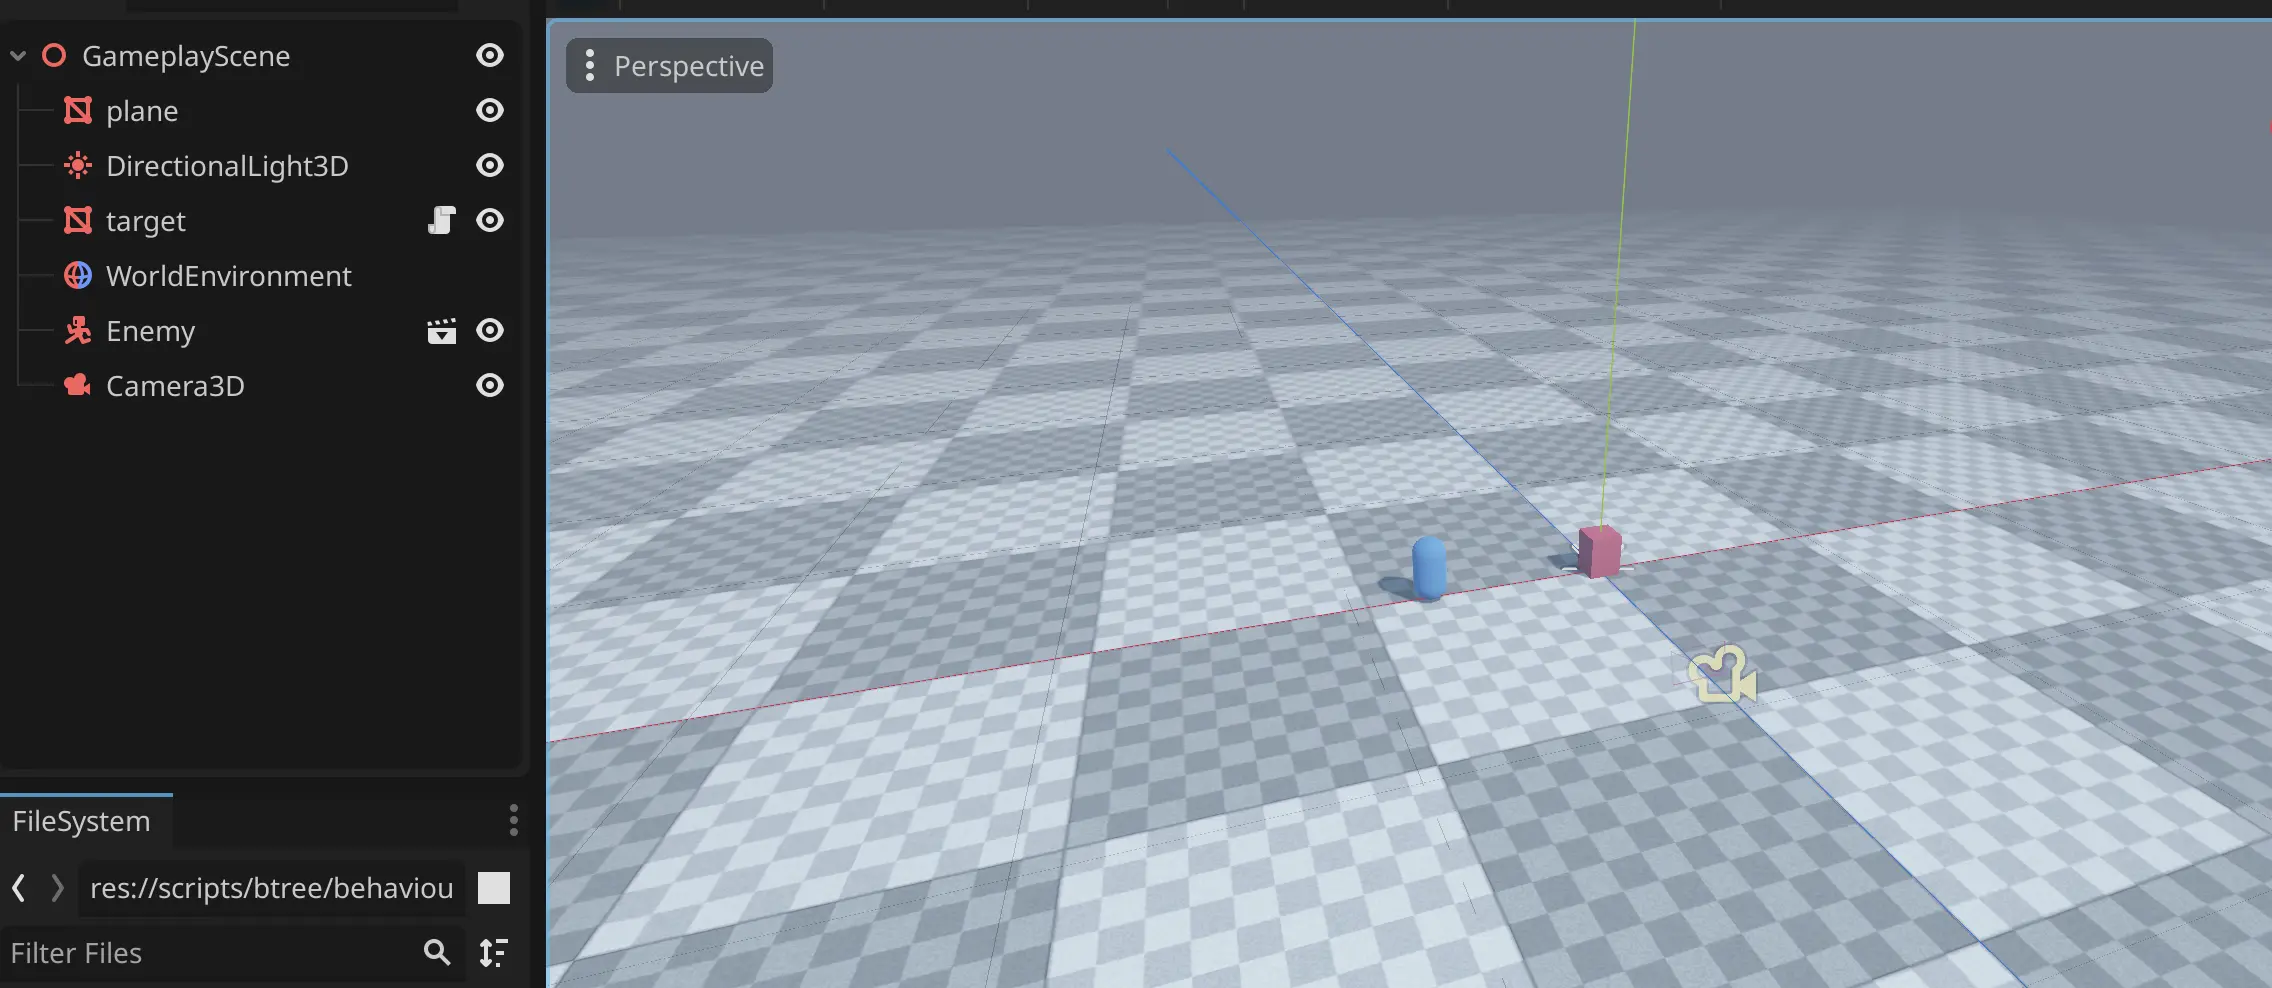 Gameplay scene
Now if we play our gameplay scene, then enemy should move towards the target.
As you can see it works, it resets its state when it reaches the target.
Now lets add another Action that will attack the target.
class_name AttackTarget
extends BehaviourNode

@export var author: Node
@export var damage_amount: int = 10


func evaluate(context: Dictionary) -> BehaviourNode.Status:
	if not FindTarget.target_ctx_name in context:
		push_error("Target is not in context")
		return BehaviourNode.Status.ERROR

	var target = context[FindTarget.target_ctx_name]
	if not target is Target:
		push_error("got invalid target to attack")
		return BehaviourNode.Status.ERROR

	(target as Target).take_damage(DamageData.new(author, damage_amount))

	return BehaviourNode.Status.SUCCESS
We will create our damage structure like the following:
class_name DamageData

var author_node: Node
var amount: int

func _init(author: Node, amount: int):
	self.author_node = author
	self.amount = amount
With that set lets create our Target and take_damage method to it, and lets also add is_alive method
class_name Target
extends Node3D

@export var max_hp: int = 100

var current_hp: int = 0


func _ready() -> void:
	current_hp = max_hp


func take_damage(damage_data: DamageData):
	current_hp = max(current_hp - damage_data.amount, 0)

	if current_hp < 1:
		print_debug("target died")
		return


func is_alive() -> bool:
	return current_hp > 0
With that we can attack our target. We can update our code for finding targets, so that it will check if target is alive if its not alive then it will fail. Which will look like this in code:
class_name FindTarget
extends BehaviourNode

const target_ctx_name: StringName = "target"


func evaluate(context: Dictionary) -> BehaviourNode.Status:
	var target_node: Node = get_node("/root/GameplayScene/target")
	if target_node == null:
		return BehaviourNode.Status.ERROR
	# Here is our check
	if not (target_node as Target).is_alive():
		return BehaviourNode.Status.ERROR

	context[target_ctx_name] = target_node

	return BehaviourNode.Status.SUCCESS
You can run it locally and see that now it stops attacking once the target is dead
Selector nodes in behaviour tree
Selector nodes are really useful to have some sort of conditional logic. From our previous nodes we can get to an error state, which might mean that we should probably do some other type of action. We will use Selector node to switch tasks, between attacking and patrolling
Selector node will look similar to sequence node but will have slight changes
class_name SelectorNode
extends BehaviourNode

@export var nodes: Array[BehaviourNode] = []

var current_node: int = 0


func _reset_state() -> void:
	current_node = 0


func evaluate(context: Dictionary) -> BehaviourNode.Status:
	if len(nodes) == 0:
		_reset_state()
		return BehaviourNode.Status.SUCCESS

	var bt_node: BehaviourNode = nodes[current_node]
	var result: BehaviourNode.Status = bt_node.evaluate(context)
	# if got an error, move to the next node in the array
	# if all nodes returned an error then return error
	if result == BehaviourNode.Status.ERROR:
		if current_node == len(nodes) - 1:
			_reset_state()
			return BehaviourNode.Status.ERROR

 		current_node += 1

	if result == BehaviourNode.Status.SUCCESS:
		_reset_state()
		return BehaviourNode.Status.SUCCESS

	return BehaviourNode.Status.RUNNING
You will be surprised how easy it is to create complex states now, lets add our Negator decorator that we will use to check the state of the FindTarget node, it is pretty simple and will look like the following code:
class_name Negator
extends BehaviourNode

@export var child_node: BehaviourNode


func evaluate(context: Dictionary) -> BehaviourNode.Status:
	var status: BehaviourNode.Status = child_node.evaluate(context)
	if status == BehaviourNode.Status.ERROR:
		return BehaviourNode.Status.SUCCESS
	elif status == BehaviourNode.Status.SUCCESS:
		return BehaviourNode.Status.ERROR

	return BehaviourNode.Status.RUNNING
We will also need a new decorator RepeatUntilFailed, which will look like this:
class_name RepeatUntilFail
extends BehaviourNode

@export var child_node: BehaviourNode


func evaluate(context: Dictionary) -> BehaviourNode.Status:
	var status: BehaviourNode.Status = child_node.evaluate(context)
	if status == BehaviourNode.Status.ERROR:
		return BehaviourNode.Status.ERROR

	return BehaviourNode.Status.RUNNING
So let’s visualize what we are trying to create:
graph TD
  Repeater --> Selector
  Selector --> AttackTargetSequence
  Selector --> RepeatUntilFail
  RepeatUntilFail --> PatrolSequence
  AttackTargetSequence --> FindTarget
  AttackTargetSequence --> MoveToTarget
  AttackTargetSequence --> AttackTarget
  PatrolSequence --> Negator
  Negator --> FindTarget_1
  PatrolSequence --> Patrol
Result behaviour tree
You can think of it like, while target is not found patrol, when target is found go and attack it.
Now let’s create simple patrolling logic with the following code:
class_name Patrol
extends BehaviourNode

@export var move_node: Node3D
@export var patrol_duration: float = 3.0
@export var movement_speed: float = 4.0

var current_patrol_duration: float = 0.0
var is_patrolling: bool = false
var movement_direction: Vector3 = Vector3.ZERO


func evaluate(context: Dictionary) -> BehaviourNode.Status:
	if not is_patrolling:
		is_patrolling = true
		current_patrol_duration = 0.0
		movement_direction = Vector3(randf(), 0, randf())
		movement_direction = movement_direction.normalized()

	current_patrol_duration += get_process_delta_time()
	move_node.position += movement_direction * (movement_speed * get_process_delta_time())

	if current_patrol_duration > patrol_duration:
		is_patrolling = false
		return BehaviourNode.Status.SUCCESS

	return BehaviourNode.Status.RUNNING
It just moves in random direction every N seconds, and if we will test it, we will indeed find that repeat until fail works properly. And character stays in patrolling state.
With that said these are the basics of behavior trees, as an exercise I can recommend adding custom behavior tree to the target, for example if enemy in vicinity then try to run away.
Source code for the project
Liked what you read? Don't forget to upvote!

Indie developer & author of this blog. I worked in game dev studio before, and launched many games. My main focuses are core gameplay mechanics and project infrastructure management.

Download our latest game
Read next

Godot multi-project setup with C#
Clean architecture in Godot C# and how to properly structure your project

